YMS-MD Status and Preference Codes
YMS-MD Status and Preference Codes
Notification Statuses
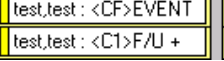
ACM Alerts uses codes to indicate the outcome of notifications. These codes are shown followed by a reason description for the appointment in this format: <xx> appointment reason description. This information can be added to the Appointment Reason field of an appointment.
For example, the first row shows that an event (i.e. appointment) received a confirmed notification <CF>. The second row indicates the follow-up appointment (F/U) notification status is <C1>, which is a custom status notification defined by the user.
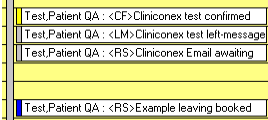
It’s possible for a patient to have multiple appointments with different notification statuses. Here’s an example: Imagine a patient has four upcoming appointments.
- Appointment 1: The system successfully confirmed this appointment with the patient (CF).
- Appointment 2: The system called for this appointment, but no one answered, so it left a message (LM).
- Appointment 3: A notification was sent for this appointment (RS), but it’s colored gray because the appointment is still tentative (e.g., waiting for confirmation or further details).
- Appointment 4: A notification was also sent for this appointment (RS), and it’s colored blue because the appointment is booked and confirmed.
| Code | Status Bar | Meaning |
| Gray or blue | The notification has been sent out and is awaiting a response. | |
| Yellow | The notification has been confirmed | |
| Yellow |
You can personalize the meaning of certain notification statuses to match how they appear in your notification messages. This means you can tailor the status to reflect the specific wording used in your notification templates. Example: "Confirmed with test result" Example: "Confirmed with Pacemaker" |
|
No-answer (voice only) |
Gray |
May mean a short call, or one that will be retried for other reasons. If the system left a "We'll try later" message, the appointment will also show This status may also be used on the final effort if the call is not answered, is busy, or cannot be "completed as dialed" |
| Gray | A person responded by pressing 1 to continue but did not confirm or cancel. | |
| Gray | The system left a message. | |
| Canceled | N/A | The system received a cancel response. The appointment will be removed from your calendar (marked as deleted) |
Important Note: The colour coding for the "notification sent" (RS) status can be customized. You can choose colors that best represent the different stages of your appointment workflow. This allows for quick and easy visual identification of each appointment's status.
Note: Please don't change the notification status codes (like "CF," "LM," or "RS"). Our system uses these codes to manage your appointment reminders.
Note: When selecting a reason for the appointment from the drop-down menu, don't modify the pre-set description. However, feel free to add any extra information or details you need after the pre-set reason.
Like any custom status in Accuro, you can substitute a visual icon instead of the default abbreviations.
To substitute, go to Scheduler > Preferences > Priorities and Settings Tab, and set the desired icons for each status type (as shown below).

When the icons have been applied, the status updates will look like below.
Important Note: The colour coding for the “notification sent” (RS) status can be customized. You can choose colors that best represent the different stages of your appointment workflow. This allows for quick and easy visual identification of each appointment’s status.
Note: Please don’t change the notification status codes (like “CF,” “LM,” or “RS”). Our system uses these codes to manage your appointment reminders.
Note: When selecting a reason for the appointment from the drop-down menu, don’t modify the pre-set description. However, feel free to add any extra information or details you need after the pre-set reason.
To ensure patients receive appointment reminders through their preferred method, you can easily set their communication preferences in their record.
- Go to Patient Demographics: Open the patient’s record and find the “Demographics” section.
- Locate the “Note” field: This is where you’ll enter the code to specify the patient’s preferred contact method. Important: Make sure you use the “Note” field, not the “Address” field.
- Add the preference code: Enter the code that matches their preference (e.g., “EMAIL,” “TEXT,” “VOICE”). Important:
- Type the codes in CAPITAL letters exactly as shown in the list of available codes.
- You can add the code anywhere in the “Note” field.
- Ensure there is a space before and after the code.
Note: These preferences override the default preference set for the clinic.
| Code | Meaning |
| PR:N | No notification |
| PR:V | Voice to number found via the configured search order |
| PR:VH | Voice to home number |
| PR:VC | Voice to cell number |
| PR:T | Text message to number via the configured search order |
| PR:TH | Text message to home |
| PR:TC | Text message to cell |
| PR:TB | Text message to business number |
| PR:E | Email notification |
Example of where the codes could be added when adjusting a patient’s demographic information:

Tip: Using ‘Preferred Contact Method’
The drop-down menu below lets you set a patient’s preferred contact method for voice notifications: Home, Cell, or Work.
Note: This choice overrides the clinic’s default settings. However, if you enter a code in the Notes field, that code will always take precedence.
Important Note: The colour coding for the “notification sent” (RS) status can be customized. You can choose colors that best represent the different stages of your appointment workflow. This allows for quick and easy visual identification of each appointment’s status.
Note: Please don’t change the notification status codes (like “CF,” “LM,” or “RS”). Our system uses these codes to manage your appointment reminders.
Note: When selecting a reason for the appointment from the drop-down menu, don’t modify the pre-set description. However, feel free to add any extra information or details you need after the pre-set reason.

")
